This Halloween dessert is delicious, easy to make, and super cute, although scary when cut in half. These strawberry and chocolate fudge mice are great finger food for any Halloween Party!

Jump to:
Halloween is such an exciting holiday. It's so fun to dress up and check out all the cute and creative costumes and decor that people come up with.
Another fun thing about Halloween is the food. I love to see how a simple snack or dish can become so fun, scary, or even disgusting sometimes.
That's why I came up with this delicious, cute, and maybe creepy strawberry and chocolate fudge mice. It's a Halloween dessert that is easy to make (no artistic talents required), cute while still whole, but kind of scary when you bite it and see the inside.
It is the perfect finger food, treat, or dessert for any Halloween party.
By the way, if you like this fudge and want to make it for other special occasions, my recipe for brigadeiros is just what you need.
Ingredients
To make these little cute mice, you'll need 5 basic ingredients:
- Strawberries
- Sweetened Condensed Milk
- Cocoa Powder
- Butter
- Chocolate bar (grated) or chocolate sprinkles
Then, you'll need the extras to make it look like a mouse, such as eyes, nose, and ears. For those, I used:
- Peanuts (for the ears)
- Colored-shaped sprinkles (for eyes and nose)

Substitutions
- Grated Chocolate: You could certainly substitute the grated chocolate (used to cover the mice) for chocolate sprinkles, but usually, grated chocolate tastes a lot better.
- Peanuts: If you have problems with peanuts, feel free to change them for sliced almonds, pine nuts, or sunflower kernels. They are a little different in shape and don't have that crevice in the middle as peanuts do, but are good substitutes.
- Strawberry: If you don't have strawberries on hand, you could use grapes or no fruits at all and just shape the fudge like a cone. Just keep in mind that if you don't use any fruit inside, you'll need to use more fudge and will end up with fewer rats.

How to make the "fudge" (brigadeiro)
I don't know how to call this treat in English. In Portuguese, we call it 'Brigadeiro' (bree-gah-day-ro). It's a very popular treat in Brazil. Trying to describe it, I would say it's a combination of fudge and chocolate caramel.
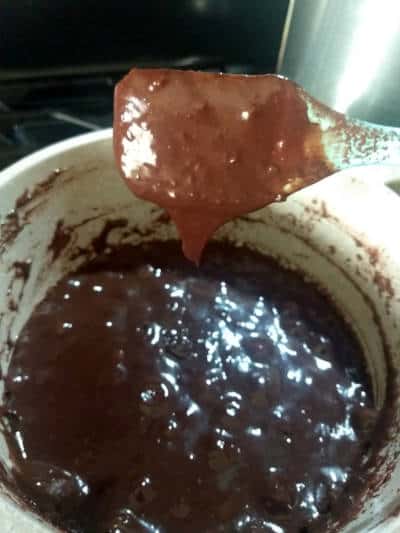
It's made out of sweetened condensed milk, cocoa powder, and butter that you cook on the stovetop for a few minutes until it becomes thicker.
As you wait for it to cool down, it becomes thicker and pliable to a point where you can roll it or just mold it to the desired shape.
It's really easy to make, but here are some tips to get it right every time:
- Sift the cocoa powder as you add it to the condensed milk. This way you won't have little clumps of cocoa in the mixture;
- Use a heavy-bottomed pan, so it won't burn the brigadeiro that tends to stick to the bottom of the pan;
- Stir the mixture for the whole time with a silicone or wooden spatula. This will prevent your brigadeiro from burning;
- After it starts simmering, keep stirring for about 3 minutes or until you see that the mixture falls away easily from the bottom as the pan is tilted. Also, as you get some mixture with the spatula, you'll see that it doesn't run freely anymore, but infect, it falls more like blocks of mixture.
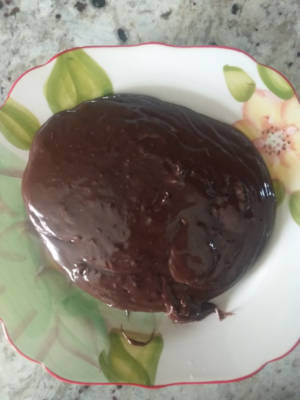
- As you turn off the heat, keep stirring it until you transfer the mixture to a greased plate. This way, it won't stick to the bottom of the pan because of the heat held in it.
- Remember, it will thicken much more after it cools down. The fudge won't achieve a pliable consistency in the pan. Actually, It will look a little too soft, but it'll get to the right consistency after it's completely cool.
- The fudge/brigadeiro for these little rats needs to be thick and stretchy when ready to mold, so it will hold the "mouse" shape.
Here are the step-by-step instruction photos:


Step-by-Step making the strawberry chocolate mouse


Tips on making the mice
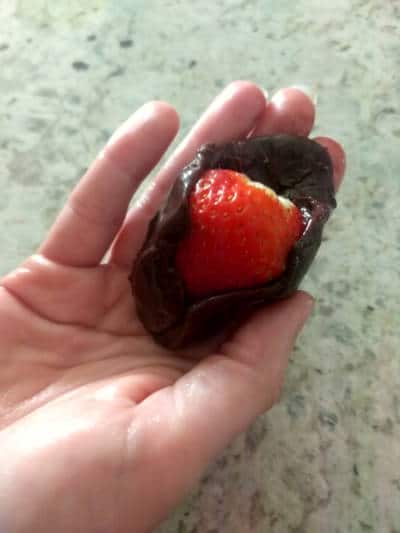
- Wash and dry really well each strawberry: If the strawberries are wet, it will be really hard to coat them, so make sure you dry them really well;
- Don't cut off the calyx (cap) of the strawberry: When you cut the top of the strawberry, water starts to come out, even if you dry it. So make sure you don't cut the cap; just use your fingers to remove the leaves. (See picture below)
- Work with wet hands: This fudge/brigadeiro is very sticky and will stick to your hands as you try to shape them. So keep a cup of water right next to you. Dip your finger in the water and spread it on the palm of your hands. Just a little bit, though, as too much water can make it slippery and hard to shape. You can also use a tiny bit of butter instead of water if you prefer.
- Call the kids to help: These little mice are easy and fun to make but can take some time (about 4 minutes each) if you're working on your own. So if you have kids or a kind partner, call them over and have some fun making these together.
Storing
Since these cuties have fresh strawberries inside, I suggest keeping them in the refrigerator. It will also help them to keep their shape. You can store them about 1-2 days.

Don't miss a recipe! Subscribe to our newsletter.
📖 Recipe / Receita

Halloween Dessert - Strawberry and Chocolate fudge mice
Ingredients
- 14 oz Sweetened condensed milk (1 can - 396 grams)
- 2 tablespoon Cocoa powder
- 1 tablespoon salted butter
- 1 cup grated chocolate or chocolate sprinkles
- 20 Strawberries (more or less, depending on the size of the strawberries)
- Roasted peanuts (sliced almonds, sunflower kernels or pine nuts also work)
- Colored shaped sprinkles
Instructions
To make the Chocolate Fudge/Brigadeiro
- Grease a plate and set it aside.
- In a medium heavy-bottomed pan, add sweetened condensed milk and sift cocoa powder over it. Mix it with a spatula until well combined. (Heat should be off)
- Turn on the heat to medium, add butter, and start stirring the mixture constantly, making sure to scrape bottom and side of the pan, so the mixture won't stick to it and burn.
- Once mixture starts bubbling around the edges, lower the heat, and continue to stir constantly. You'll see that the mixture starts to thicken, like a thick brownie batter. You can turn off the heat when you scrape the bottom and you can easily see it, because the mixture is now moving slowly. Also, if you tilt the pan, the mixture should pull away from the bottom and side of the pan.
- Once you turn off the heat, transfer the fudge/brigadeiro immediately to the greased plate, and wait for it to cool. You can take it to the fridge to speed up the process. Waiting for it to cool will allow the fudge to achieve the right consistency to be shaped.
Making the mice
- Wash and dry (really well) all strawberries. Remove leaves with your finger. Don't cut the cap with a knife.
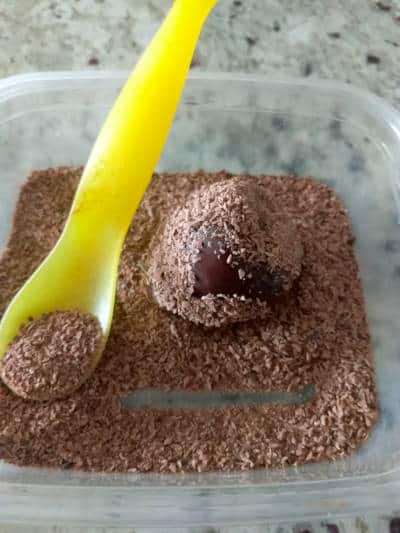
- Wet your hands with a little bit of water. Get enough fudge to be able to cover one strawberry. Open it on the palm of your hand. Place the strawberry inside and close the fudge around it. Roll it between the palms of your hands to shape it. (See photos in post).
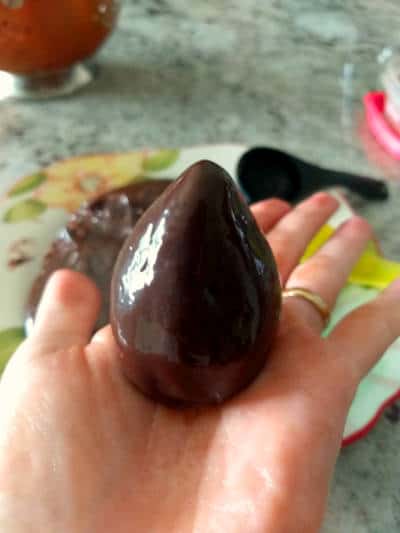
- Roll Strawberry fudge on grated chocolate or sprinkles, until completely covered.
- Get a tiny amount of fudge and shape it as a tail with the palms of your hands. Stick it to the back of the strawberry.
- Open peanut in half, and stick them to the thinner part of the mouse's body, where the ears are supposed to be.
- Stick circle shaped sprinkles in the place of the eyes, and a little ball sprinkle on the tip of the strawberry fudge, as the nose.
- Keep it refrigerated until it's time to party.
Notes
Sharing is caring
Nutrition Estimate:
Nutritional disclaimer
All nutritional information above is based on third-party calculations and should be considered estimates. Nutritional content may vary according to brands used, measuring methods, portion sizes, substitutions, optional ingredients, etc. Simple Living Recipes is not responsible for any miscalculation or misinformation in the nutrition label.

*All nutritional information above is based on third-party calculations and should be considered estimates. Nutritional content may vary according to brands used, measuring methods, portion sizes, substitutions, optional ingredients, etc...
More Recipes for Parties and Gatherings


Follow us on Social Media!
Save this Recipe to your Pinterest!

More recipes for Holidays and Special Occasions...


Natalie says
Can I make the fudge a few days ahead of time?
Lilian Vallezi says
Hi Natalie!
Yes, it's fine to make it one or 2 days before. Just keep it in the fridge, covered with plastic wrap touching the brigadeiro. The brigadeiro should be kind of stretchy and hold its shape easily. I hope you like it.
Nina says
Made this recipe for a themed vampire night. Substituted peanuts for sunflower seeds due to allergies. I bought big strawberries, not realising how large they become when covered in the fudge. Definitely will try for smaller berries next time for more bite sized rats! I cooked it a long time as recommended, and the textures was perfect, it molded really well. Cook it longer than you think you have to, until you can really make a pathway in the pan when stirring and it doesn't slide back over it immediately..be patient!
Sooo delicious. Tricky to work with, definitely keep hands moist and be patient again. Everyone was very happy to eat them.
Lilian Vallezi says
Hi Nina!
Thank you so much for your feedback! I'm so glad you like it!
Yes, the key for this recipe is to cook the brigadeiro long enough. It's a little time consuming but so worth it! They are so delicious!!
Thanks!
Lilian
Emily says
Incredibly tasty, but we simply could not get the fudge to stay on the berries, even after chilling them overnight. It was a runny mess and so frustrating to work with. Really wish we could've made them work, as the flavor truly was amazing.
Lilian Vallezi says
Hi Emily!
I'm so sorry it didn't work out for you. This treat really is super tasty, but if not cooked for the right amount of time, it will be too runny and it won't hold the shape.
If you decide to make this once again, please make sure to cook it for the right amount of time. As I said in the instructions, you need to cook until you scrape the bottom of the pan and you can easily see it, because the mixture will be so thick that it moves very slowly. It should fall from your spatula in chunks.
If you cook it for the right amount of time, it will be easy to shape it once cold.
Hope that helps.
Thanks,
Lilian
Chloe says
Not as easy as they make it look. You have to switch between cold and wet and make sure the chocolate stays cold or else it won't mold to the strawberries.
Lilian Vallezi says
Hi Chloe!
It sounds like your mixture wasn't cooked properly.
In order for the mixture to hold the shape, you need to cook it for the right amount of time. As I said in the instructions, you need to cook until you scrape the bottom of the pan and you can easily see it, because the mixture will be so thick that it moves very slowly. It should fall from your spatula in chunks.
If you cook it for the right amount of time, it will be easy to shape once it's at least room temperature. I've made this treat dozens of times, but I know it can be a little tricky for the first timer.
Hope that helps.
Thanks,
Lilian